19. THELI GUI trouble-shooter and frequently asked questions
This is the trouble-shooter for the THELI graphical user interface.
19.1. Before everything else
- Make sure you have the latest version. The THELI GUI develops fast and is used by many people. If you find a bug, it is likely that someone else found it before you and that it has been fixed already.
- Think. A data reduction package based entirely on scripts forces you
to think through everything before you embark on launching the scripts.
You have to come up with the right syntax, make sure the data are in the
right place, and so on. The purpose of a graphical user interface is
to remove this technical overhead, greatly facilitating data reduction.
However, there is a downside. Together with the removal of the
technical overhead some of the user’s higher brain functions are shut
down as well. Clicking a button merely involves a few neurons to move
the index finger, whereas coming up with the right script syntax requires
some serious thinking. Therefore, with GUI reduction, always try to stay
in the picture and ask yourself this question:
- What am I currently doing to my data?
- THELI has a steep and long learning curve. 95% of all problems are
encountered by beginners and are simply due to wrong handling or
misconceptions. THELI makes a lot of effort to anticipate and eliminate
such situations, yet they do happen. When they occur:
- Ask yourself this question: What am I doing right now?
- Try to understand what is happening to your data at the particular reduction step.
- Think whether your parameter choice makes sense.
- Look it up in the documentation, everything is explained there.
- Check the trouble-shooter below.
- The problem is still around: Please ask your more experienced colleague in the office next door.
- THELI still doesn’t do what it’s supposed to do: Contact me (schirmer[at]mpia.de) and do not forget to send along the LOG file. Without the LOG file I can’t help you. If you reduced data from a multi-chip camera using more than one CPU, please re-run the task with a single CPU before sending the LOG file, as otherwise it is scrambled by the multiple simultaneous outputs. The LOG files can be found here.
19.2. Use the integrated help layer
THELI comes with a substantial on-the-fly help layer. It assists you through
- Tool-tips: Little markers with short explanations that appear when you hover over any GUI element with the mouse cursor.
- What’s this?: In the GUI, click on Help, select What’s this and then click on a specific reduction task to obtain more extensive help. If that doesn’t help, read the online documentation (i.e. these webpages).
- Internal consistency checks: THELI does not allow you to e.g. enter characters into numeric fields. It will also check that the data expected or necessary for a certain reduction task is actually present before a task is executed. THELI will attempt to solve a problem invisibly to you in the background. Should this be impossible or ambiguous, then you will be notified by visible warning or STOP messages. These are either self-explanatory or tell you how to proceed or fix a problem. Don’t click them away. They are meant for you to read them, not to scare you.
- Error scanner: THELI scans the output of all reduction scripts for characteristic error messages. The line number in the LOG file in which the error occurred is then displayed, together with LOG file itself. With some bash scripting skills you should be able to identify quite some of the problems. Note that the error often occurs before the actual error THELI stumbles upon, so scroll upwards and see where it starts breaking down. If you contact me because of an error message or unexpected behaviour, please ALWAYS include the LOG file. They can be found here.
- Disk space warning: You can set two alarms that will notify you when the available disk space in your home partition and/or the main data partition drops below a certain threshold.
- Ancillary files: THELI produces quite a number of secondary files that help you trouble-shooting. For example, you can overlay the objects detected by THELI over the corresponding images, using skycat or ds9. Likewise, astrometry produces a number of check-plots, and so on.
19.3. General questions about THELI
How does THELI compare to other data reduction tools? We are confident that it provides you with close-to-perfect results. THELI has been extensively tested and compared with other large-scale data reduction packages, and uses some of the most advanced third party algorithms (in particular various Terapix tools). In terms of ease-of-use, flexibility and completeness our users say that it is one of the best tools available. Give it a try, you’ll probably like it very much :-)
Can I make use of parallelisation? Just select the number of CPUs in the INITIALISE section.
Can I make mosaics with THELI? Yes, THELI will automatically assemble your images as they are located on sky.
My instrument is not pre-configured in THELI. Can I still reduce my data with it? If it is an imaging camera, yes! THELI will assist you creating the corresponding configuration files and splitting scripts.
How about difference imaging with narrow-band filters? THELI’s responsibility ends with the production of coadded images. There is no module for sub-sequent difference imaging, or any other post-reduction analysis tool. However, THELI allows you to create precisely registered images in different filters which can be subtracted right away from an astrometrical point of view (see the processing of multi-color data sets). There is no problem with processing narrow-band images in THELI.
19.4. Trouble-shooting
The following sections deal with the most frequently encountered errors NOT caught by THELI in advance, and describes some other problems. All command line tools mentioned require that you have the THELI binary directory in your PATH environment variable.
19.4.1. Preparation
The splitting script runs really fast, does not produce any output, or creates garbage. Most likely this is because you work with self-defined instruments, and the splitting script has not been set up correctly. When THELI creates the splitting script, it has to make some assumptions about the format of the input raw data. Likely, your raw data deviates significantly from what is usually the case. This can be either certain FITS header keywords or the way the FITS image is structured. Check the output of the LOG file for errors, and manually edit the splitting script such that it suits your data. The splitting script can be found in
~/.theli/scripts/process_split_<YOURINSTRUMENT>.sh
If the problem occurs with a pre-defined splitting script, then please contact me and provide a sample raw data file. Likely, some format has changed or an invalid keyword is present.
error: cannot open/read fits: See the paragraph above. Maybe your image is
compressed? Some systems store compressed images in files having a .fits
suffix, from which alone the compression is not visible.
mmap: Invalid argument: You are (most likely) running THELI in a Virtual Machine, and keep the data in an exchange folder that can be read by the guest Linux OS as well as the host OS. This leads to problems with file access and permissions, depending on the settings for this shared folder. You must keep all images on the virtual Linux partition. This error occurs with Windows, I do not know if similar issues exist with MacOS.
19.4.2. Calibration
Many of the problems described here are caused by wrongly defined instrument configurations, i.e. they will appear mostly with self-defined instruments, and usually only once (i.e. until you fixed your camera config).
Cannot extract such zone: This error message appears when the geometry of your images is smaller than what has been specified in the instrument configuration. THELI then tries to extract pixels that do not exist. Likely, you got confused when entering chip geometries manually. If you work with self-defined instruments, you should always use the Guess … function to determine the chip geometries based on an example image. Another explanation could be that you work with binned data, whereas the instrument configuration was made for unbinned data. In this case you would need to create a separate instrument configuration for the binned data. The corresponding splitting script can be created by simply copying the script for the unbinned data, as the data structure itself does not change.
mmap: Invalid argument: You are (most likely) running THELI in a Virtual Machine, and keep the data in an exchange folder that can be read by the guest Linux OS as well as the host OS. This leads to problems with file access and permissions, depending on the settings for this shared folder. You must keep all images on the virtual Linux partition. This error occurs with Windows, I do not know if similar issues exist with MacOS.
Incompatible plane sizes in list: This error message appears when images of the same chip but with different sizes are present. These cannot be combined into a master bias/dark/flat. Either some binned data is present, or a corrupted file, or a calibration image that was taken e.g. during day-time by observatory staff in a different configuration. Check the file sizes to identify the offending exposure, or execute the following command in the corresponding directory:
dfits *.fits | fitsort NAXIS1 NAXIS2
Bias (dark, flat) and cube have incompatible sizes: Occurs when calibration image and the images to which it is applied (after overscan correction and trimming) have different sizes. This does not happen if you reduce the data with the same instrument configuration file, but for example if you changed some setting in the instrument configuration after creating the master bias/dark/flat and before applying them to the images. It can also happen if you import some calibration image reduced with a different software package and want to apply it in THELI; that is something you should NEVER do.
Flat-fielding does not at all work as expected: If your data does not appear as it normally does after flat-fielding, or shows significant over-correction (under-correction) of vignetting, and if it is not the usual background residuals, then check the following possible causes:
One or more of the flat field exposures is significantly over- or underexposed, or saturated. Identify such exposures using basic image statistics with the the command
imstats *.fits
Use the min-max parameters right next to the Process flats task to reject bad exposures.
You did not subtract a bias/overscan from the flat-field, or the overscan region is badly defined. In this way a large pedestal can be left in the flat, distorting the intensity ratios.
You defined an overscan in your camera configuration even though the data has no overscan, or you subtracted a bias even though your data has no bias (e.g. because it has been subtracted internally as is the case with near-infrared data). Again, this distorts the intensity ratios in the flat. If you defined an overscan region but your camera has none, then enter zeros in the corresponding fields of the instrument configuration.
The flat fields were taken in a different filter.
Significant scattered light was present when the flats were taken. Try a different set of flats or obtain some archival flat fields.
Dark subtraction does not work as expected: Your camera has significant dark current, e.g. visible as individual hot pixels, and they are still present after you run through the Calibrate data task. There are three likely reasons for this:
- You must explicitly mark the Use DARK switch next to the Calibrate data task. Otherwise a bias is subtracted.
The detector temperatures for your dark frames and the target exposures were different (different exposure times are compensated for). Solution: Use different darks. You can also try to manually rescale them by a few percent. For example, to increase the dark by a factor of 1.03, you would do
cd /mainpath/DARK
mv DARK_1.fits DARK_1_backup.fits
ic '%1 1.03 *' DARK_1_backup.fits > DARK_1.fits
and then re-run the calibration of the data: Click on the blue Redo arrow next to the Calibrate data task which restores the previous data status, and then repeat the calibration.
If you are an amateur astronomer and took data with a DSLR camera, there is a chance that your camera electronics botched it up in different possible ways. In some cases results can be better without dark subtraction (use the Do not apply BIAS/DARK option at the top of the Calibration section).
19.4.3. Background
Defringing does not work: Fringes are caused by highly variable line emission in the upper atmosphere (airglow). The longer the wavelength, the worse it gets. If defringing does not work as expected, then the most likely cause is that the fringing pattern itself changed too much over the time window from which you created the correction image. Consider using a dynamic instead of a static background model, or choose a smaller window size for the dynamic model. Switching off the fringe rescaling can help if the background is not dominated by airglow but by scattered light (twilight, zodiacal light, moon).
A key to successful defringing are short exposure times and frequent dithering. In other words, the wrong observing strategy can render your data useless.
19.4.4. Weighting
Large parts of the coadded image are masked out: You were probably too zealous when applying thresholds to the global weight. Re-run the global weights with less restrictive settings (FLAT_norm min/max) and check WEIGHTS/globalweight_i.fits afterwards. Only those regions which you want to be masked should be masked in these images.
How can I get rid of those satellite tracks? Satellites can be masked like this.
Stars in the coadded image have masked cores: If you are working with significantly undersampled data, stars will be mistaken for cosmics by the automatic cosmic detection. In the configuration of the Create WEIGHTS task, leave the Cosmics threshold field empty. To get rid of cosmics, you can use the outlier rejection in the coaddition.
19.4.5. Astrometry / Photometry
This is where your brains are required. Making use of it greatly helps.
Any problem with astrometry: PLEASE READ THIS FIRST.
Understanding Scamp check-plots: PLEASE READ THIS FIRST.
Sure you read these two links? Then continue.
In almost all cases problems with astrometry boil down to one common issue: insufficient overlap between object catalog and reference catalog. The number of reasons for this is almost infinitely large, but essentially it always comes down to this point. With increasing experience you’ll become more proficient. Solving an astrometry problem requires you to look into four places. If you do not know where to start, then I strongly suggest that you check all of them:
Reference catalogue:
Catalog type: Does the reference catalog chosen match your data, mostly in terms of depth, but sometimes also in terms of wavelength coverage?
Radius: Too small (large) for your field of view?
Mag limit: No sense in having this deeper than the depth of your individual exposures. It shouldn’t be too shallow either. To check, overlay the reference catalog over your images in skycat or in ds9. These are stored under:
~/.theli/scripts/theli_mystd.skycat
~/.theli/scripts/theli_mystd.reg
Note that if the FITS header coordinates are significantly off, it can be difficult to visually match the catalog entries with the sources in the image.
Object catalogs (create source cat):
Overlay the object catalog over your image in skycat or ds9 and see what you have detected! Only the brightest sources? Lots of spurious faint stuff?? Hot pixels??? Overlay the reference catalog at the same time (see above)! Do they have a significant amount of objects in common?
In skycat there is a default limit of 1000 objects displayed. If your catalog contains more, you must increase this limit. Object catalogs in suitable format can be found here:
SCIENCE/cat/skycat
SCIENCE/cat/ds9cat
In skycat use Data servers -> Local catalogs -> Load from file …. In ds9 use Region -> load.
- Empty fields: In sparsely populated fields, in particular in the near-infrared, you may want to push the detection thresholds down to DT=1.5 and DMIN=5.
- Dense fields: It is sufficient to get the brighter stars only, DT=10…100, DMIN=5..20. A few hundred sources per chip are sufficient!
- Maximum FLAG: There are situations in which most reference sources you have appear saturated in the images. In this case, increase FLAG from 0 to 8. If your image quality is dodgy, and the number density is low, and other stuff happens, crank it up to 60 (seriously, I hope your data are better than that).
- Minimum FWHM: Lots of hot pixels, but well sampled data? Set this to anything between 1.5 and 2.5, with strongly oversampled data even higher. This will remove the spurious detections (THELI should get rid of most of them automatically). Is your data undersampled? Make it 1.0, maybe even 0.8 with strongly undersampled images. Less than about 0.8 makes no sense.
Scamp configuration: Even if the overlap between reference catalog and object catalogs is sufficient, astrometry can still fail. The reason is that the solution space is in general very large and needs to be limited. This is controlled by the various Scamp parameters. If the true solution lies outside the search range specified, e.g. the offset between nominal and sky coordinates is 3 arcminutes but you set POSITION_MAXERR=2, you can vary all other parameters as much as you want, the correct solution will never be found. Same holds for the pixel scale or the sky position angle.
Users with cameras where the raw FITS data comes without WCS information should carefully check if the coordinates entered manually are correct and close to the reference pixel (usually, the middle of the image). POSITION_MAXERR should be chosen accordingly. POSANGLE_MAXERR can be set to 180, and match flipped images can be activated, too.
FITS headers: Don’t trust them. If the astrometry just doesn’t want to work out, maybe the position angle in the CD matrix is wrong? Or the RA/DEC coordinates are off by several (or even many) arcminutes? This even happens with modern telescopes: the telescope operators accidentally loaded the wrong pointing model, or forgot to update the TCS with the correct instrument after an instrument change (and the new camera has its main axis looking in a 90 degree different direction), or else. It has happened before, it just happened (which is why I am writing this), and it will happen again. Just don’t think you are immune. To check, overplot the reference catalogue over the image. You should be able to find the pattern quickly. See also item 2 above.
Inaccuracies likely to occur: Your astrometric solution is wrong. See above, and try again.
Not enough matched detections: Either the depth of your reference (or object) catalog is too low, in which case you should go deeper with the reference catalogue (or detect more objects in the images). Or the overlap between the reference catalogue and the object catalogue is insufficient for other reasons, e.g. manually entered coordinates are wrong, etc…
No match with reference catalog: Self-explanatory. See above for possible solutions.
It just doesn’t want to work: Scamp check-plots look garbage, no matter what you did? Again: did you overlay the object and the reference catalog over the images? Do they agree reasonably well? What objects are detected?
A really dirty hack for sparse fields with ill-defined distortions: One problem with near-infrared observations is the very low number density of sources in the images, and often in the reference catalog as well. If that happens it can be really hard to get the distortion right. In such cases you can attempt a self-calibration: Try to achieve a half-way reasonable distortion model in first place, possibly one with distort=2 or even distort=1. Create a coadded image, and use it to extract the reference catalogue. Then repeat the astrometry. Chances are good that the distortion model found will be significantly better, because the reference catalogue matches the image almost perfectly well. Proof of concept:
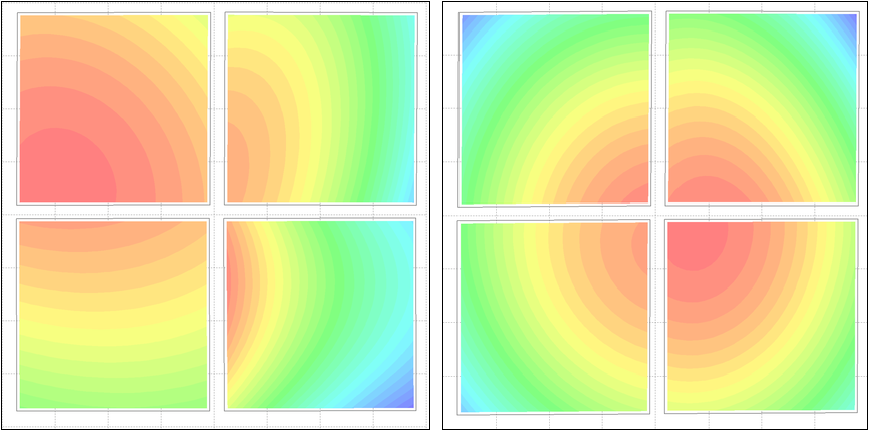
The left panel shows the HAWKI@VLT distortion measured from a sparse field. This was the best calibration possible, using the USNO-B1. The data was stacked and from the coadded image a new reference catalog was created, which was fed into Scamp. Using the same parameters, the much improved distortion model shown in the right panel emerged.
I have a multi-color data set. What is the best way to do astrometry on it? See the section about multi-color data processing.
19.4.6. Coaddition
If there is a problem with coaddition, it’s mostly the astrometry: The coaddition only does what is written in the astrometric FITS headers created by Scamp. If the solution in the headers is wrong, the coaddition will be wrong. A wrong astrometric solution is not necessarily recognised by the astrometric solver, and sometimes only recognised by eyeballing the coadded image. If you have a problem with coaddition, go back to the astrometry. This holds in particular for the following examples:
Significant inaccuracy likely to occur in projection: This is an astrometry problem and means that something is wrong with the astrometric distortion calculated by Scamp. It can well be the case that you don’t notice anything in the coadded image, or that only one corner is affected and that you don’t care. However, try to go back to the astrometry and get an improved solution with different settings. Try different reference catalogues, detection thresholds, depths, lower distortion degrees, and so on. It is sufficient to run the first coaddition task, prepare_coadd_swarp.sh, to check if the error occurs again, no need to go through the full coaddition. Simply erase the other commands from the command window. As for the reason why this error is detected by SWarp during the coaddition but not by Scamp, let me use Emmanuel Bertin’s wording:
The reason is that SWarp needs to invert the astrometric solution, which otherwise is given in the FITS header as (alpha,delta) = f(X,Y). The inversion is required because, contrary to Scamp, SWarp works predominantly on distorted astrometric solutions using a reverse mapping approach. In the presence of distortion terms, the inversion process involves fitting a polynomial on a 2D-grid, and checking that the direct mapping followed by the obtained reverse mapping gives back the same coordinates within a small tolerance all over the grid. The message Significant inaccuracy likely to occur in projection occurs whenever this condition is not met, which generally means that the solution is not invertible, and therefore is unlikely to be correct.
The coadded image looks distorted, warped, strange, badly registered etc: There is nothing wrong with the coaddition process. What is wrong is the astrometric solution. Fix it, and try again.
The coadded image wasn’t created at all, is tiny, or huge, or empty (all pixels null): There are several explanations: Either you specified reference coordinates far outside the actual field of view, or the astrometry is wrong, or your weights are all zero (wrong thresholding of flats during creation of the global weight).
Part of the coadded image is masked: You were probably too zealous when applying thresholds to the global weight. Re-run the global weights with less restrictive settings (FLAT_norm min/max) and check WEIGHTS/globalweight_i.fits afterwards. Only those regions which you want to be masked should be masked in these images.
The coadded image is too small and does not contain all pointings: This usually happens with very wide fields of view and all-sky projections. Provide a manually chosen size for the coadded image.
Null or negative global weighting factor: Either the globalweight is indeed null (check!), or the reference coordinates given for the coadded image are far off the actual target coordinates.
Resampling takes forever, one of the images is much larger than the others: Again, there is no problem with the coaddition. What’s wrong is the astrometry.
The coadded image appears strongly (de-)magnified: Did you accidentally switch to a different instrument? In rare occasions it can happen that THELI cannot retrieve all information from a LOG file correctly, and selects the wrong instrument (with a totally different pixel scale) upon launch.
Stars in the coadded image have masked cores: See here.
Wrong number of elements in key P_xxx: You deleted catalogs of some images and then re-run the coaddition. Re-run the catalog creation step to fix that.
Truncation in the coadded image: Two solutions:
You probably specified reference coordinates which are significantly off the centre of the field or even outside the area on sky that is covered by your images. Give coordinates closer to the centre.
If you are talking about extremely wide field mosaics and all-sky projections, it can be that you have to edit the header of the output image manually. To this end, run the prepare_coadd_swarp.sh step only, i.e. erase all other commands from the command window. Then, edit the NAXIS1 and NAXIS2 keywords in the following FITS header according to your needs:
~/.theli/scripts/coadd.head
Make sure that the “=” sign stays in the 9th column, the “/” sign in column 31, and that each line has precisely 80 characters in length (filled up with blanks if necessary). Otherwise the FITS header will be corrupted. Increasing NAXIS1 and NAXIS2 will provide more space to the right and to the top of the image. If you need more space to the left and at the bottom, increase CRPIX1 and CRPIX2 by the necessary amount (and possibly NAXIS1 and NAXIS2). Once done, click on the Coaddition task again. This time, remove the prepare_coadd_swarp.sh task and keep all the others.
Sorry, this is cumbersome, but predicting the necessary size with such extremely wide field images and all-sky projections is not trivial and does not always work well using an automated approach.
Cannot open file for reading / writing (setting ulimits): This is a classic with SWarp, and will happen if more files than allowed are opened at the same time for coaddition. Usually, the maximum number of files to be opened at any given time by a user is set to 1024, as you can verify with:
ulimit -a
To change this permanently (at least under Ubuntu) to a higher value, you have to do the following:
In /etc/security/limits.conf, add/set the following two lines:
*  soft  nofile  100000
*  hard  nofile  100000
In /etc/pam.d/su and /etc/pam.d/common-session, add/uncomment the following line:
session required pam_limits.so
Afterwards, logout and login again, and verify with the ulimit command that your open files parameter is set to 100000.