16. Advanced usage
This section provides some more background information and contains a collection of useful tricks and techniques. Some of them are meant for troubleshooting, others will help you reduce data more efficiently.
16.1. Change processing status
THELI indicates the processing status of the data in the file names, between the chip number and the suffix. A typical file name will look like
filename_<chipnumber><status>.fits
The status string encodes the various steps you have done and which
resulted in a modification of pixel values. With advancing data reduction,
more identifiers are appended to status. The following identifiers are
used:
| ID | Meaning |
|---|---|
| OFC | Data has been overscan corrected, flatfielded, and the overscan regions have been cut away. This string will always be appended by Calibrate data, even if you did not overscan correct or flat-field the data. |
| B | Background modelling |
| H | Chop-nod sky correction |
| C | Collapse correction |
| D | Deblooming done |
| P | Direct absolute photometry per chip |
| .sub | Sky subtraction |
THELI stores this status internally and provides it as an essential argument
to many scripts. It can happen that status does not reflect anymore
the actual status files have on disk. Reasons are manifold, for example the
user started a new data reduction without resetting the logfile, or data
was modified/deleted manually outside THELI and the processing is resumed with
data at an earlier processing status.
Before a script is executed, THELI checks if images with status in their
file name do exist, and if none are found the user will be notified. In this
case one can tell THELI the current processing status by setting or removing
the corresponding tickmarks in the Status menu:
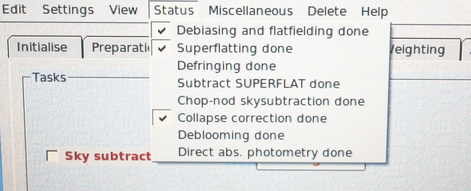
Afterwards, simply re-select the task you wanted to execute and continue.
16.2. Processing only a particular chip from a multi-chip camera
Assume you have a multi-chip camera, and one of the following situations occurs:
- One of the chips needs additional treatment (for example collapse correction) that you do not want to apply to the other chips
- You want to process one of the chips with slightly different parameter settings
- You want to quickly test some parameters without running through all chips
To understand how to proceed, let’s have a look at how THELI’s parallelisation works.
16.2.1. THELI’s parallel manager
In all relevant cases, you deal with parallelised scripts, easily recognisable by their syntax displayed in the command window, e.g.
./parallel_manager.sh <script_name.sh> [arguments]
What parallel_manager.sh does is to call script_name.sh as many times as CPUs have been specified. It also appends additional arguments (the chip numbers to be processed by each CPU), which are required by script_name.sh but not shown to the user. If, for example, we work with a camera having 8 chips, and we want to use 4 CPUs, parallel_manager.sh would launch the following four instances:
./<script_name.sh> [arguments] "1 5"
./<script_name.sh> [arguments] "2 6"
./<script_name.sh> [arguments] "3 7"
./<script_name.sh> [arguments] "4 8"
Therefore, if you want to just process e.g. chip number 2 with different settings, you would manually remove parallel_manager.sh and write instead:
./<script_name.sh> [arguments] 2
If you want to reprocess chips 1, 3 and 4, you would modify the syntax to:
./<script_name.sh> [arguments] "1 3 4"
Note
Since you manually remove parallel_manager.sh from the command, no parallelisation takes place anymore.
16.2.2. Different data reduction statuses for various chips
Using the scheme outlined above, you can not only change parameters for a particular chip, but you can also run it through additional data reduction steps. In this case, however, extra care needs to be taken, because the processing status of that chip will change. Hence the status string in the file names is not the same anymore for all chips, and thus THELI will not be able to identify all chips in the next reduction steps. This can be corrected as outlined in the following.
Example: Data were debiased and flat-fielded, and the status string OFC appears in the file names. You then want to run chip 3 through the collapse correction. The following steps must be done:
Activate the collapse correction, and change the syntax to:
./process_collapsecorr_para.sh MAINPATH SCIENCEPATH OFC 3Data from chip 3 will now show the status string OFCC, whereas the others are still called OFC. The previous OFC-images of chip 3 are located in a new sub-directory called OFC_IMAGES. You must now manually rename all other OFC images to OFCC, using:
cd /MAINPATH/SCIENEPATH

rename OFC OFCC *OFC.fits
Alternatively, you could also rename all OFCC images to OFC:
cd /MAINPATH/SCIENEPATH

rename OFCC OFC *OFCC.fits
In the latter case you must also change the processing status in THELI, as THELI assumes that images have been collapse corrected and therefore carry OFCC in their file names (which they don’t, because you renamed everything to OFC). Simply remove the corresponding tickmark next to Collapse correction done in the Status menu.
16.3. Processing multi-color data sets
Imagine you observed a target in several filters, B, V and R, and you arranged the raw data in the following way:
/mainpath/BIAS
/mainpath/FLAT_B
/mainpath/FLAT_V
/mainpath/FLAT_R
/mainpath/TARGET_B
/mainpath/TARGET_V
/mainpath/TARGET_R
If you follow the standard reduction approach in THELI then you would reduce one filter at a time: you declare one flat and target directory in the Initialise section, e.g. FLAT_B and TARGET_B.
This is a bit tedious with several filters, and can be done more efficiently, leaving the directory entries unchanged.
16.3.1. Preparation
When you tell THELI to split the raw data, it will issue the following commands in the large white command window:
./check_rawfilenames.sh /mainpath/ BIAS
./process_split_<instrument>.sh /mainpath/ BIAS
./check_rawfilenames.sh /mainpath/ FLAT_B
./process_split_<instrument>.sh /mainpath/ FLAT_B
./check_rawfilenames.sh /mainpath/ TARGET_B
./process_split_<instrument>.sh /mainpath/ TARGET_B
The entries listed in the command window can be edited. By means of copy & paste you can manually rearrange them a bit, including the other filters:
./check_rawfilenames.sh /mainpath/ BIAS
./check_rawfilenames.sh /mainpath/ FLAT_B
./check_rawfilenames.sh /mainpath/ FLAT_V
./check_rawfilenames.sh /mainpath/ FLAT_R
./check_rawfilenames.sh /mainpath/ TARGET_B
./check_rawfilenames.sh /mainpath/ TARGET_V
./check_rawfilenames.sh /mainpath/ TARGET_R
./process_split_<instrument>.sh /mainpath/ BIAS
./process_split_<instrument>.sh /mainpath/ FLAT_B
./process_split_<instrument>.sh /mainpath/ FLAT_V
./process_split_<instrument>.sh /mainpath/ FLAT_R
./process_split_<instrument>.sh /mainpath/ TARGET_B
./process_split_<instrument>.sh /mainpath/ TARGET_V
./process_split_<instrument>.sh /mainpath/ TARGET_R
The check_rawfilenames.sh scripts have to be executed before the process_split scripts, hence they can be grouped together for better visibility.
16.3.2. Calibration
Process the bias images normally.
When processing the flats, expand the commands listed as follows:
./parallel_manager.sh process_flat_para.sh /mainpath/ BIAS FLAT_B
./parallel_manager.sh process_flat_para.sh /mainpath/ BIAS FLAT_V
./parallel_manager.sh process_flat_para.sh /mainpath/ BIAS FLAT_R
./parallel_manager.sh create_norm_para.sh /mainpath/ FLAT_B
./parallel_manager.sh create_norm_para.sh /mainpath/ FLAT_V
./parallel_manager.sh create_norm_para.sh /mainpath/ FLAT_R
Same with the target exposures. Do not forget to edit the FLAT_X string (!):
./parallel_manager.sh process_science_para.sh /mainpath/ BIAS FLAT_B TARGET_B
./parallel_manager.sh process_science_para.sh /mainpath/ BIAS FLAT_V TARGET_V
./parallel_manager.sh process_science_para.sh /mainpath/ BIAS FLAT_R TARGET_R
16.3.3. Weighting
The globalweight depends on the filter. Therefore, make sure you do create the weights for each filter immediately after you create the globalweight, as the latter will be overwritten:
./par... create_global_weights_para.sh /mainpath/ FLAT_B_norm TARGET_B
./par... create_weights_para.sh /mainpath/ TARGET_B OFC
./par... create_global_weights_para.sh /mainpath/ FLAT_V_norm TARGET_V
./par... create_weights_para.sh /mainpath/ TARGET_V OFC
./par... create_global_weights_para.sh /mainpath/ FLAT_R_norm TARGET_R
./par... create_weights_para.sh /mainpath/ TARGET_R OFC
If you masked satellites by hand, you must include the transform_ds9_reg.sh scripts before create_weights_para.sh.
16.3.4. Astrom/Photom
Now that the pre-processing is done you can combine all images in a common directory, e.g.
/mainpath/TARGET_ALL
and treat them as if they belong to the same filter. Enter TARGET_ALL as the new SCIENCE directory in the Initialise section. However, there are three things you have to keep in mind:
Note
If you want to do absolute photometry you must create parking directories for filters V and R while dealing with filter B, and so on.
When creating source catalogs, remember that the object density can vary significantly from filter to filter, e.g. you could have much less sources in B than in R. Make sure that the detection settings return a sufficient number of sources in all filters. If this is not possible, treat filters independently (i.e. use parking directories).
During astrometry with Scamp, make sure that you set
- ASTRINSTRU_KEY = NONE
- PHOTINSTRU_KEY = FILTER
- STABILITY_TYPE = INSTRUMENT
In this way Scamp will calculate a common astrometric solution for all filters, while doing independent photometry for each of them.
A common astrometric solution can be very useful if e.g. one of the filters features very few sources (such as observations in U-band), making distortion correction with that data alone difficult. By setting ASTRINSTRUKEY to a non-existing keyword, e.g. NONE, all exposures in all filters will be used to create a common distortion model. This is also useful for difference imaging or other applications where you want the same source to end up exactly in the same pixel.
16.3.5. Coaddition
Sky-subtraction can be performed normally, pretending all exposures in the TARGET_ALL directory belong to the same filter.
The coaddition itself has to be done per filter. In the configuration menu for the coaddition you can select from a small pull-down menu which filter you want to stack. There is no need to make images in the other filters invisible by moving them to parking directories.
Identical image sizes
Note
For a consistent astrometric projection of the coadditions it is essential that you choose identical reference coordinates in the configuration. Do not leave these fields empty with multi-color data sets! If you do not do that, images cannot be automatically registered to identical sizes with objects in identical positions (should this be important for your research).
Once you created all coadditions with identical reference coordinates, you will realise that they still have different image geometries. This is due to variations in the dither pattern etc. Fortunately, this can be fixed very easily due to a consistent astrometric projection on sky and without further resampling:
Open the Prepare color picture dialog in the Miscellaneous section of the GUI’s main menu bar. A list of all coadd_xxx directories will appear, in our case
coadd_B
coadd_V
coadd_R
(provided that the FILTER keyword in the headers is B, V and R). All you have to do next is to click on Get coadd images. When this step is done, you will find the registered coadded images and their weights as
/mainpath/color_theli/B.[weight].fits
/mainpath/color_theli/V.[weight].fits
/mainpath/color_theli/R.[weight].fits
16.3.6. Different processing steps required
What, for example, if the R-band images need to be defringed, whereas this step is not necessary for the other filters? This will lead to a problem with the combined processing approach outlined above, as the processing status of some of the images will have changed. Therefore THELI will not identify the other images correctly anymore.
The work-around is straight forward once you are done with background modelling, or collapse correction, etc):
A backup copy of the data just before the defringing step already exists (in that case it would be called OFC_IMAGES).
The defringed images will have the
statusstring OFCB in their file names. Rename the images manually. THELI provides you with a useful command line tool called rename, which you can find inTHELI/theli/bin/Linux[_64]/
The syntax is easy, in this case
cd  /mainpath/TARGET_R
rename OFCB OFC *OFCB.fits
This will replace the string OFCB by OFC in all files *OFCB.fits.
Note
Some Linux distributions come with a (perl) executable that is also called rename. It does something similar, albeit with a different syntax. If you included the THELI binary directory in your PATH variable, it might shadow the perl command.
Lastly, you need to make THELI forget that it defringed some data: simply remove the defringing entry from the Status menu bar.